🐕💩Supa easy RENTER FRIENDLY Dog Poo Worm Farm🪱🧑🌾

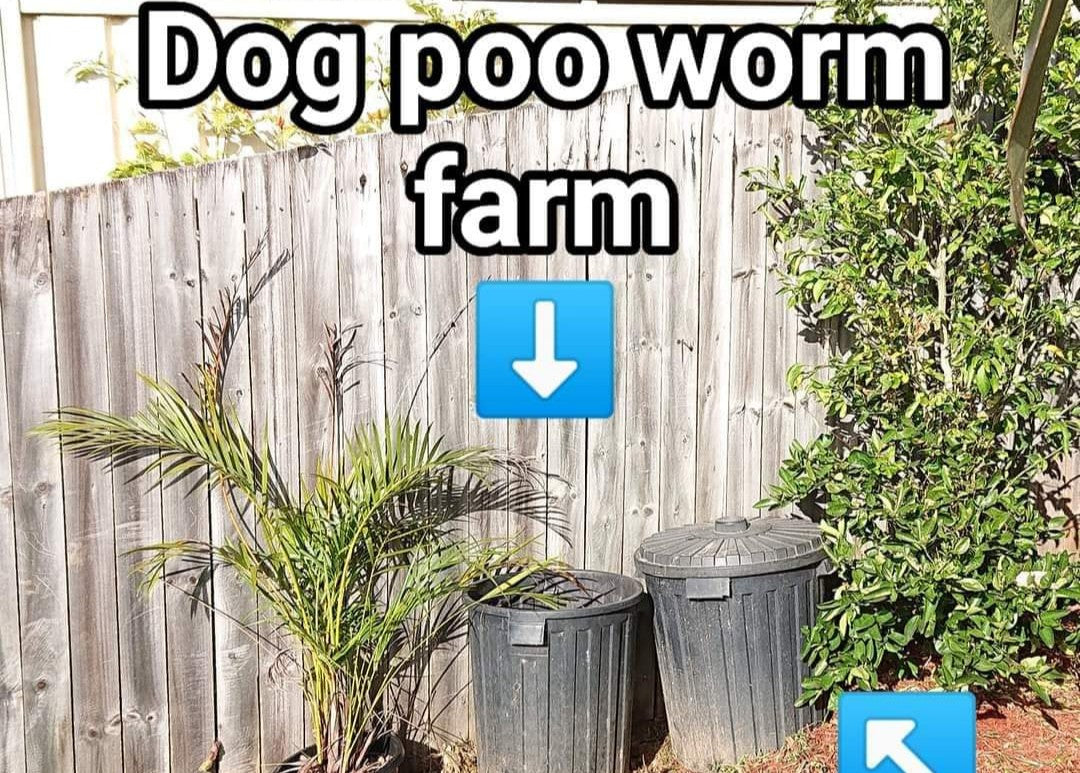
(Image description: This image is a photo. In this image there is a silvery grey fence on a slop, running from lower on the left to higher on the right. In front of the fence, from left to right is a short palm tree in a black pot. beside that is two black 60 lt bins. the one on the left has no lid. the one on the right has a lid on. to the right of the bins is a garden with a tall shrub and red wood chip around the base. In front of these there is shorth green grass. Edited over the photo are the words; "Dog poo worm farm" with an arrow pointing to the bin on the left, at the top of the image. and then at the base are the words "Grass Bin" with an arrow pointing to the bin on the right).
.
.
🦗First tho, for those in suburban houses, what do you do with your Grass Clippings when you mow?
We put ours in 60lt bins, that have holes drilled in the base. I have these bins positioned around the yard, so I don't have to cart the clippings to the bin. They are kind of in each corner but not exactly. It's amazing how much fits in there when you stomp it down, and then how quickly it breaks down to half the size. And how earth worms just magically appear in there, along with lots of eggs! If you have a worm farm, throw a handful of your composting worms in 🪱💚
.
During summer, if the grass is growing quicker than its breaking down, when the bin gets to just over 3/4 full and is fully stomped down, can't possibly fit any more in without going over that 3/4 full mark, then I'll start another bin, and stack it on top. Note, it can get heavy, if beside works better for you, do that. With the three bins we have spread out across the block, it doesn't happen often.
.
🪱🪱🪱
OK, DP (dog poo) Worm Bin.
This is a slow, very low maintenance, set and forget system. Its portable and can be jazzed up in a number of ways to look more 'pretty' to appease property managers. It can be scaled up or down to any container size. For a quicker alternative, try a Hot Compost method. For us, composting dog poo is more about avoiding sending it to landfill where it will then create and release harmful gasses. The final product is an added bonus.
We have one dog, a medium sized Staffy, at the moment and did not fill this bin in the12months we were at this rental property. Previously we had two dogs, a medium sized Staffy, and a large Great Dane! This system worked brilliantly in both cases.
.
Step 1)
➡️Get a bin, make sure it has drainage. Drills holes in the bottom if needed.
😂 Check out the gaping hole in the bottom of ours! There was a few large cracks, and then it split and fell out when was emptying it last time. It's been on the go for years but still has use. Once in place I won't be moving it for a good while.
.

(Image description; This image is a photo. In the center of the image is a black 60lt bin with a massive hole to one side of the base. The bin is dusty and dirty, and we are looking down at it from above. In the background there is smally leaf litter over dirt, and potted plants to the top of the image. The words "good drainage" is edited over the center of the bin).
.
Step 2)
➡️Add a good thick layer of broken-down (aged) grass clippings or other organic matter like leaf litter, to the base. If you are desperate, you could use cardboard torn into small pieces and some wood store brought chip, just make sure both are well soaked before using. Give this base layer a light watering in.
.

(Image description; This image is a collage of three photos. photo one stretches across the top half of the photo, while photo two and three are half an half across the bottom half of the collage. The first photo is of a black bin filled with greyish brown aged grass cutting. there is a pooper scooper filled with aged grass cuttings, and scraper laying across the top of the bin. Photo two on the bottom left half of the collage is zoomed in on the aged grass cutting in photo one. There is a hand pointing to a small white dot. it is a worm egg. Photo three in in the bottom right of the collage. This image is further zoomed in on the worm egg from photo two. The worm egg is in the middle of the image. Its pale orange-brown in a small tear drop shape. the grass cutting are silverish grey. Edited across the center of the collage are the words "Brocken down grass clippings", and the words "Worm Egg" are at the bottom center).
.
Step 3)
🪱Add worms to this layer. I haven't added worms to ours because they are already present in the broken-down grass clippings that I've used.
.
Step 4)
➡️Throw in the poopy then cover with another layer of organic matter, and a light watering. Once there is a few layers, I use the pooper scoop to lift the existing organic matter on one side, and just add the poop there, then cover up again. At this stage you can use fresh grass clipping or other organic matter. No need to turn or aerate, just water from time to time. Its ok to dry out a little, as the worms will just move to the base. In fact its better to dry out a little than it is to be too wet!
.

(image description;)
.
Step 5)
➡️Forget about it!
💦 Well not completely. Keep it moist. Damp, not wet.
.
🎩We don't put a lid on ours bc if tends to invite ants. But if you want to, go ahead, and if you want to soften the look, turn the lid upside when putting it on, and now you can place potted plants on top 🌿🌿🌿
.
❓What if I don't already have a worm farm, and there's no worms present when gardening.
This is a-ok. Most rentals these days are ecologically baren, at first glance, your luck if you even have a 'garden'. There are many things we can do to boost your ecology, but that's a whole other side quest. I will make another post, or DM if you want to know more sooner. Hit up your social media garden pages, especially Permaculture groups, or make friends / ask around at your local community garden. People get a real kick out of sharing 🍃🍃🍃
As a last resort you can buy a worms from bunnings or online.
.
❓What do I do once it's full.
Basically, start another one. You can stack one on top of the other. The bottom one rests, and breeds worms, while the top is filling. By the time the filler is full, the bottom will be ready.
If you don't want a bin just sitting there chilling, you can speed up the process by turning it daily or weekly if your not as mad keen.
.
When the resting is emptied, it should be one consistent colour, moist, and a dense almost silty clay like in texture.
.
Use this on ornamentals only!
You can use it to;
~ make compost style teas ~ 1part to 10parts water ~ use fresh, do not store!
~ Sprinkle around ornamental gardens, or sprinkle sparingly in pot plants, and then water in. I say sparingly because it can be very rich.
.
❓Placement.
The dog poo worm farm ideally should have direct contact with earth, be in part shade or morning sun only is preferred. Failing that, insulate by placing plants, cardboard, or whatever you can in front of the sun side.
My first choice was against a northeast facing fence, on the edge of the existing rental properties garden. morning sun afternoon shade, out of the way, but still easy to access and somewhat central to the dogs main run area. I moved away the dyed wood chips and there's fucking weed mat that already has fraying and a hole. Fuk I hate weed mat! I also hate this dyed woodchip, looks so shit and fake, like, landscapers add it to look 'clean', but it just looks tacky, and is to a red flag to so many other issues.

(image description;)
.
Im still learning about image descriptions and accessibility wording for photos, this description is from the fb post, I'll transfer these to the image description section here.
Image 4📸 a collage of 4 photos. Photo 1, where I wanted to place the dog poo worm farm, on the edge of the garden, but there's weed mat there. Photo 2 & 3 are closer shots of the weed mat. Photo 4 shows a hole in the weed mat with fraying plastic. I hate it.
Image 5📸 is a collage of 3 photos. Photo 1 shows a bin of broken down glass clipping. Photo 2 is of my hand pointing at a worm egg. Photo 3 shows a close up of the worm egg
Image 6 📸 is a collage of 4 photos of the process of adding organic matter and dog poo. Photo 1 shows a thick layers of moist grass clippings across the bottom of a plastic bin, with a little bit of dog added. Photo 2 shows a layer of broken down grass clippings has been added. Photo shows a lot of dog poo added. Photo 4 shows there dog poo covered in fresh grass clippings.
#CreateNoWaste
#RentersPermaculture
#DogPooWormFarm